

Cursor support is in Beta. To enroll, request access from your Cloud Capital Customer Success Manager. Once your account is enabled, Cursor appears as an option on the New Integration page. If you don’t see it yet, reach out to your Customer Success Manager.
What Cloud Capital accesses
Cloud Capital uses the key only to read team usage and membership data. User / Cloud Agents keys will not work. This integration does not enable commitment purchasing or billing transfer.
What’s available with Cursor today
Before you begin
- Teams Admin key — Create a key from Cursor Dashboard → Team API Keys. Keys start with
crsr_. - Not User / Cloud Agents keys — Those keys cannot call the Team Admin endpoints Cloud Capital uses and will fail the connection test.
- Seat rates — Cursor does not expose seat dollar prices on this API. Cloud Capital synthesizes seat fees from members × your default seat rate.
- Plan — Team Admin API keys work for Teams (Enterprise is not required for this path).
Setup
1
Create a new integration in Cloud Capital
In Cloud Capital, go to the Integrations page — from Cost Allocation, use Manage Cloud Providers. Click Create New Integration and choose Cursor.The new integration opens on the Integration Settings page. Give it a descriptive name.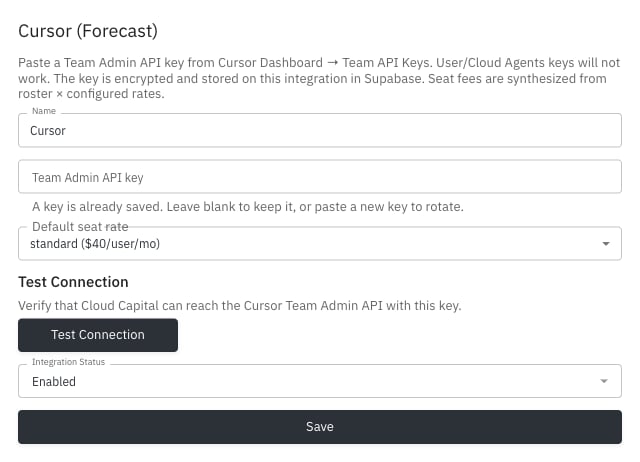
2
Create a Team Admin API key in Cursor
In the Cursor Dashboard, open Team API Keys and create a Team Admin API key.The key must start with
crsr_. Copy it once at creation time.3
Paste the key, set seat rate, and test
On the Integration Settings page:
- Paste the Team Admin API key into the Team Admin API key field.
- Choose a Default seat rate that matches your Cursor seat type:
- standard
- premium
- free
- Click Test Connection. Cloud Capital verifies it can reach the Cursor Team Admin API (members and usage).
- After a successful test, set status to Enabled and click Save.
Seat fees are synthesized from roster × your configured rate — pick the type that matches how you bill seats; you can change it later and re-save. You must complete a successful connection test before you can enable a new integration. To rotate a key later, paste a new key and re-test; leave the field blank to keep the stored key.
What to expect after setup
- Data timing — Cost data is ingested on a scheduled nightly cycle. Expect dashboards within about 24 hours of a successful connection.
- Usage + seats — Model usage comes from filtered usage events; seat fees are synthesized from team members × your configured rates.
- Forecast only — Commitment purchasing and billing transfer are not part of this integration.
Troubleshooting
Security
For a full overview of how Cloud Capital handles data access, encryption, audit logging, and compliance, see the Security page.