

GCP support is in Beta. To enroll, request access from your Cloud Capital Customer Success Manager. Once your account is enabled, GCP appears as an option on the New Integration page. If you don’t see it yet, reach out to your Customer Success Manager.
What Cloud Capital accesses
Cloud Capital reads using a service account that is unique to your environment. Five grants are required:All five grants are strictly read-only. Cloud Capital cannot create, modify, or delete any resources in your Google Cloud environment.
roles/billing.viewer includes visibility into your negotiated contract pricing, billing account credits and anomalies, Google’s own commitment recommendations, and billing account payment metadata. Cloud Capital uses these to price your usage at your actual rates rather than list rates. If your security review needs a narrower discussion of any specific permission, raise it with your Customer Success Manager.
Cloud Capital runs its BigQuery queries in its own project rather than yours, so the query cost is ours, not yours. The grants above only need to let us read your data — no query or compute permissions are required on your project.
What’s available with GCP today
Before you begin
- GCP permissions — Between you and your colleagues, you need Billing Account Administrator, Organization Administrator, and BigQuery Data Owner. The grants are independent, so they can be applied in any order by different people. Organization Administrator is the one most likely to sit outside your team. If you can’t get it, Step 4 covers granting on folders instead.
- Export type — Use the Standard usage cost billing export to BigQuery, not the detailed / resource-level export.
- Two required exports — Cloud Capital needs both the Standard usage cost export and the Committed use discount (CUD) subscriptions export. Both are enabled from the same BigQuery export tab in Google Cloud. The CUD dataset does not exist until that export is switched on, so enable both before running the grants.
- Check for existing exports first — GCP only exports data from the point an export is enabled, so an export that has been running for a while is worth finding. Check whether either export already exists in your billing project before creating a new one; connecting to an existing export gives Cloud Capital history from its start date rather than from today.
- CLI tools — The grant commands use
gcloud,bq, andjq. All three are preinstalled in GCP Cloud Shell.
Setup
1
Create a new integration in Cloud Capital
In Cloud Capital, go to the Integrations page — from Cost Allocation, use Manage Cloud Providers. Click Create New Integration and choose GCP.The new integration opens on the Integration Settings page named 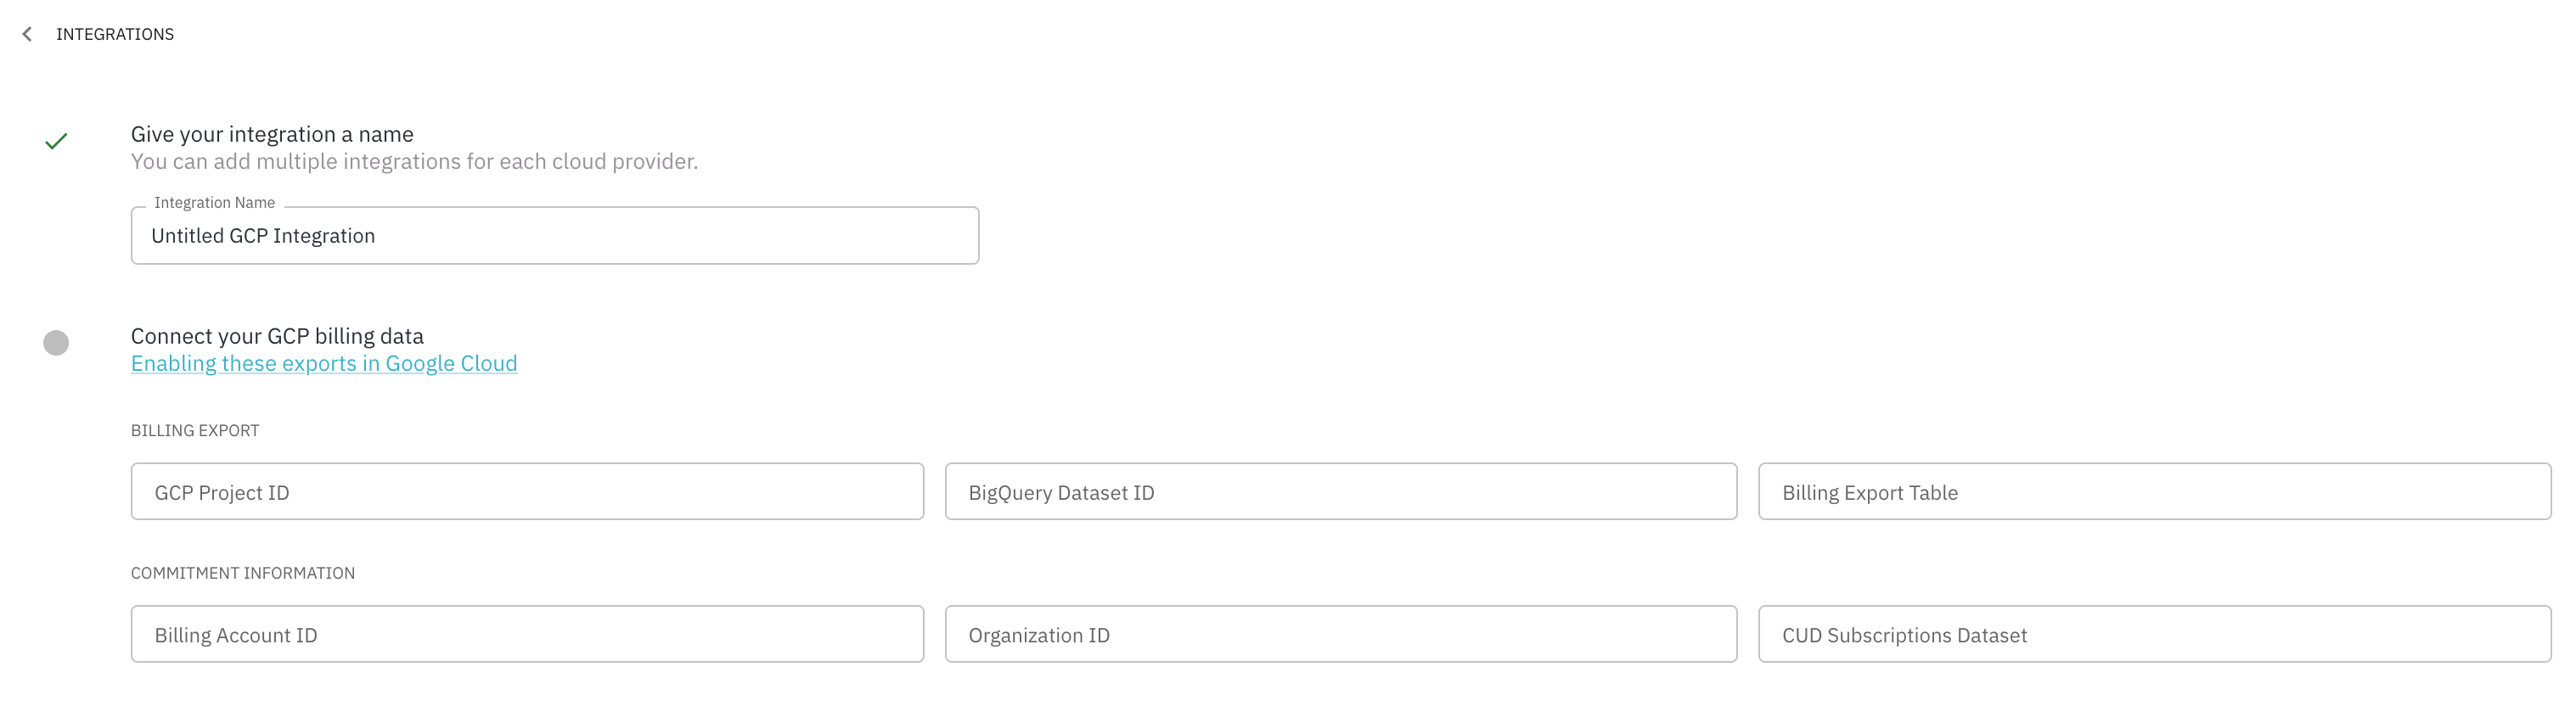
Untitled GCP Integration. Replace that with something descriptive — you can add multiple integrations per cloud provider, so the name is how you’ll tell them apart. You’ll enter your coordinates and grant access on this same page in the steps below.2
Enable both BigQuery exports in GCP
In the Google Cloud Console, go to Billing → Billing export → BigQuery export. Cloud Capital needs both of these:
- Standard usage cost export. Its table is named like
gcp_billing_export_v1_XXXXXX, in the dataset configured for the export. - Committed use discount (CUD) subscriptions export. This lives in a separate dataset and contains a
cud_subscriptions_exporttable.
See Google’s billing export setup documentation for the setup steps. A newly enabled export starts empty and fills going forward — GCP does not backfill it.
3
Find your coordinates
The Cloud Capital integration form asks for six values, split into two groups.Billing export — find these in the BigQuery Console: expand your billing project in the explorer, select the export dataset, and copy the export table’s name.
Commitment information — find the billing account ID under Billing and the organization ID under IAM & Admin → Settings in the Google Cloud Console.
The CUD Subscriptions Dataset is the dataset, not the table. Cloud Capital reads the
cud_subscriptions_export table inside it.4
Grant Cloud Capital access
On the Integration Settings page, the Grant Access step shows the service account email to grant to:Copy it from the app rather than from this page — it is specific to your Cloud Capital environment, and a mismatch is the most common cause of a failed connection test.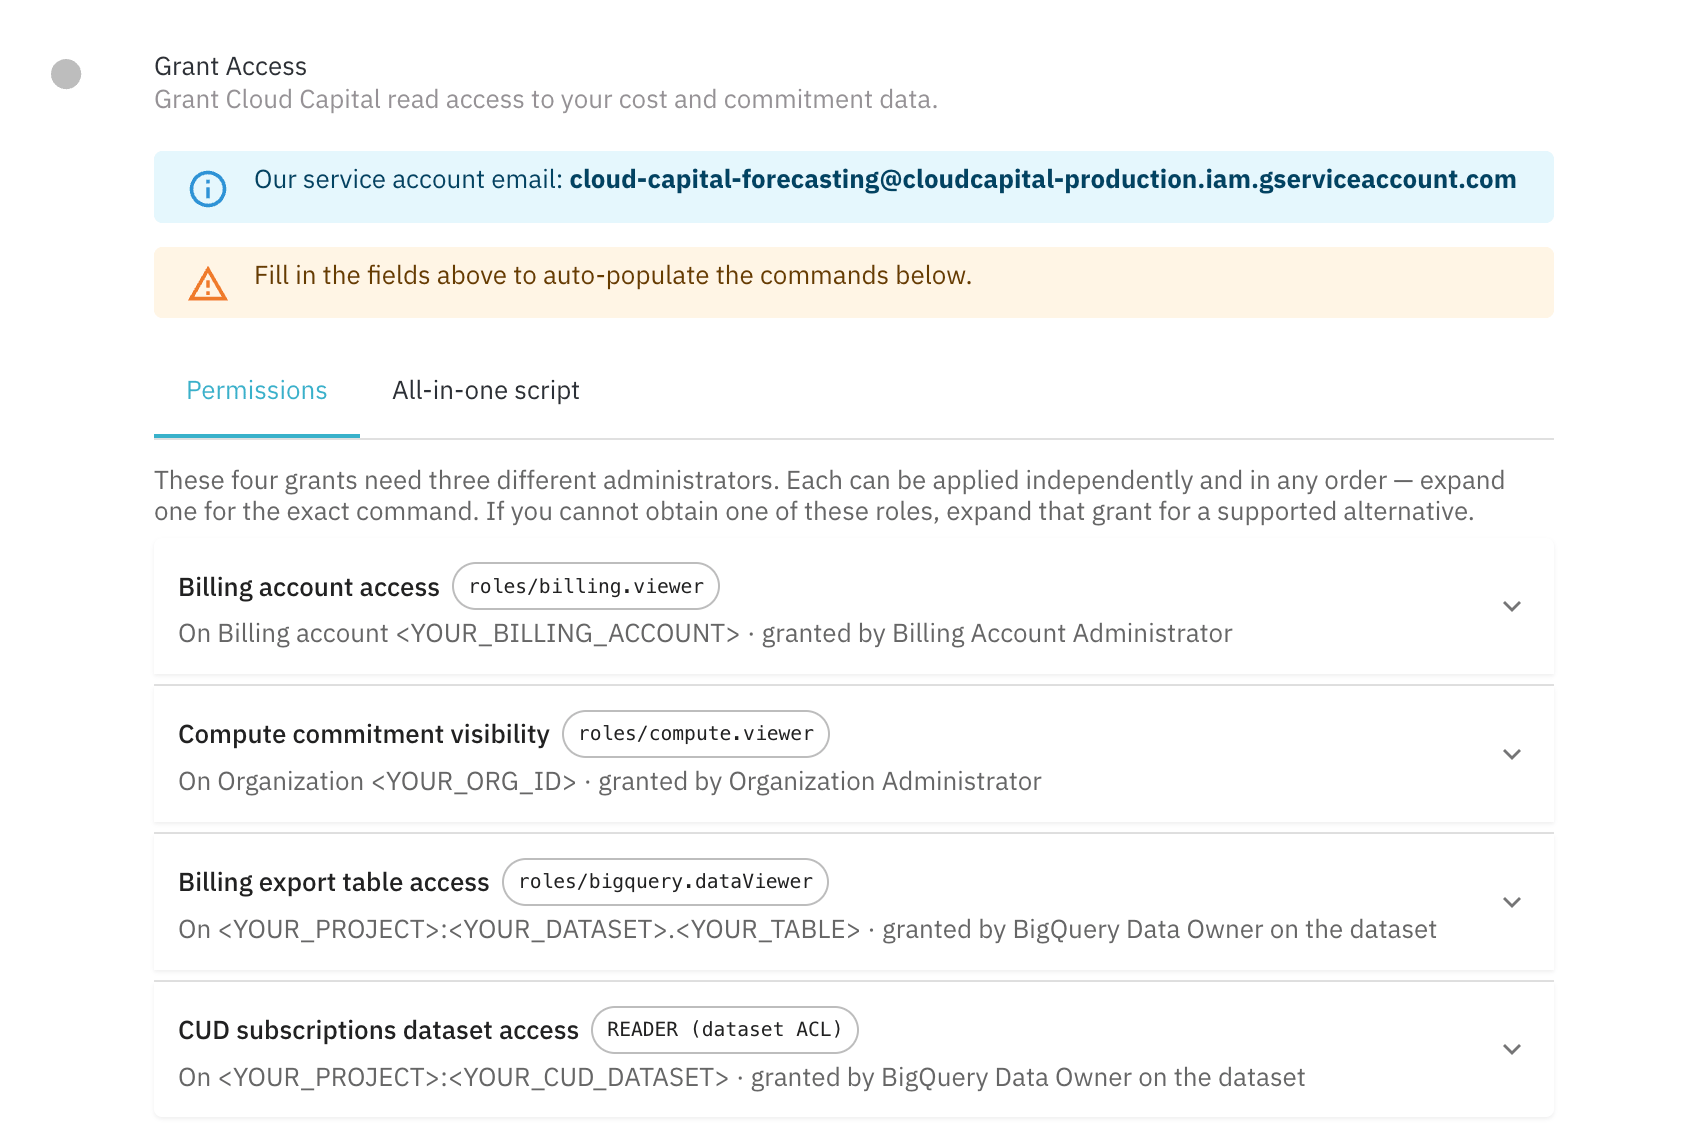
- Permissions (recommended)
- All-in-one script
These five grants need administrator access in three different places — your billing account, your organization, and BigQuery. Each grant is independent and can be applied in any order, so if the access is spread across your team you can route each command to whoever holds it.
Billing account access — roles/billing.viewer
Billing account access — roles/billing.viewer
Granted by Billing Account Administrator, on your billing account.Gives Cloud Capital your contract pricing, commitment insights, anomalies, and credits.
Compute commitment visibility — roles/compute.viewer
Compute commitment visibility — roles/compute.viewer
Granted by Organization Administrator, on your organization.Gives Cloud Capital your resource-based Compute commitments. Grant this at the organization if you possibly can — it covers your whole estate, including projects you create later, and it’s the only version of this grant that keeps working without maintenance.
Genuinely can’t get Organization Administrator? Granting on folders is the next best thing — IAM inherits downward, so a folder grant still covers projects created in it later. Failing that, you can grant per project. See If you can’t grant at the organization, below this tab group.
BigQuery commitment visibility — roles/bigquery.resourceViewer
BigQuery commitment visibility — roles/bigquery.resourceViewer
Granted by Organization Administrator, on your organization.Gives Cloud Capital your BigQuery capacity commitments.
roles/bigquery.resourceViewer is a read-only role of 16 permissions; it does not let Cloud Capital create or change reservations.This one is organization-only. There is no folder or per-project version, and the fallbacks below do not apply to it. Capacity commitments live in a reservation admin project that your organization designates, which need not be one of the projects your billing account pays for. A narrower grant would silently miss commitments held in a project Cloud Capital cannot enumerate, which reads as “you have no BigQuery commitments” rather than as an error.
Billing export table access — roles/bigquery.dataViewer
Billing export table access — roles/bigquery.dataViewer
Granted by BigQuery Data Owner on the dataset, scoped to the single export table.Gives Cloud Capital your cost data.
CUD subscriptions dataset access — READER (dataset ACL)
CUD subscriptions dataset access — READER (dataset ACL)
Granted by BigQuery Data Owner on the dataset.Gives Cloud Capital your spend-based commitments.The CUD subscriptions export is an Analytics Hub linked dataset, where per-table IAM is structurally unavailable —
bq add-iam-policy-binding against a table in it fails. Access is granted through the legacy dataset ACL instead, by reading the dataset resource, appending an access entry, and writing it back. READER is the ACL equivalent of roles/bigquery.dataViewer.If you can’t grant at the organization
This section covers the Compute commitment visibility grant only. The BigQuery one has no narrower form at all. See the note in its accordion above.The organization-level grant is strongly preferred, and it’s worth a conversation with whoever holds Organization Administrator before falling back. If that grant genuinely isn’t available to you, there are two narrower options — and IAM inherits down the resource hierarchy, so granting at a folder is much closer to the organization grant than granting per project.Grant on folders (preferred fallback). If your projects are organized under folders, a grant on a folder covers every project inside it — including sub-folders and projects created in it later. That preserves the property that actually matters: new projects are covered automatically, without anyone remembering to do anything. It needs Folder IAM Admin rather than Organization Administrator, which is far more commonly delegated.gcloud resource-manager folders list --organization=<ORGANIZATION_ID>, or find them under IAM & Admin → Manage Resources in the Google Cloud Console. If your estate is organized so that every billed project sits under a folder you can grant on, this is effectively as durable as the organization grant. Projects created outside those folders are still uncovered, so it’s worth checking whether that can happen in your setup.Grant per project (last resort). If there’s no usable folder structure, granting roles/compute.viewer on every project the billing account pays for gets you the same commitment visibility today. It needs Project IAM Admin on each project.Whichever level you grant at, Cloud Capital reads commitments project by project and reports any it can’t reach, so the connection test tells you whether your chosen scope actually covers the estate. Re-test after adding projects or restructuring folders.
5
Test the connection and save
Back on the Integration Settings page:
- Enter all six values from Step 3. Test Connection stays disabled until the BigQuery coordinates are filled in.
- Grant access as described in Step 4, if you haven’t already.
- Click Test Connection. You can test before saving.
- A new integration starts with status Draft. A successful test switches it to Enabled automatically.
-
Click Save.
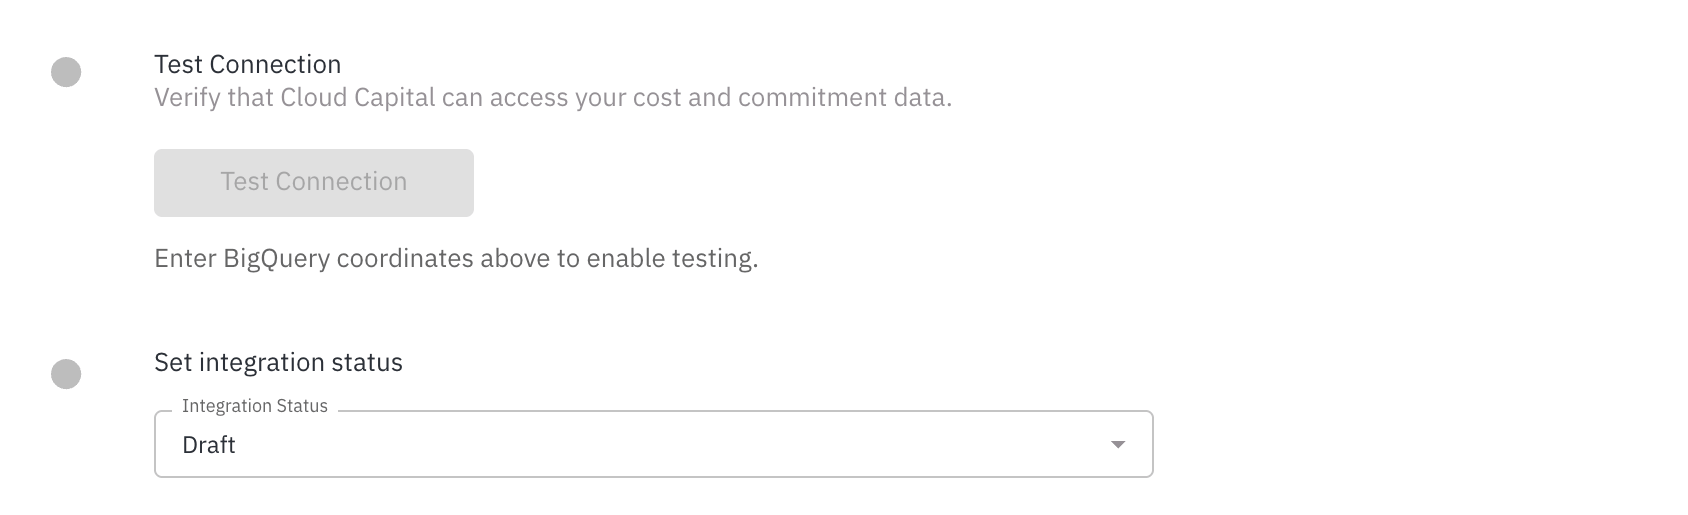
The connection test confirms access. It does not validate the exports’ contents or confirm that data has been ingested yet.
What to expect after setup
- Data timing — Cost data is ingested on a scheduled nightly cycle, not instantly on save. Expect your first data in dashboards within about 24 hours of a successful connection, provided the billing export table already contains data.
- Empty at first is normal — If you just enabled the exports, GCP may not have written rows yet. Cloud Capital will pick them up on the next nightly cycle.
- Commitments — GCP commitments appear on the Commitments page once the inventory refresh runs. Three sources are needed for a complete picture: the Compute API supplies resource-based commitments, the CUD subscriptions export supplies spend-based ones, and the BigQuery Reservation API supplies capacity commitments. None is a superset of another, so a missing grant on any one of them leaves a blind spot rather than a partial view.
Troubleshooting
Security
For a full overview of how Cloud Capital handles data access, encryption, audit logging, and compliance, see the Security page.